The last
thing I want to discuss in a little bit of detail is winding technique
and flying technique. I have already described the 50/50 winding method,
which is winding half the turns with the rubber stretched out and the other
half while walking towards the model, and the next thing I want to introduce
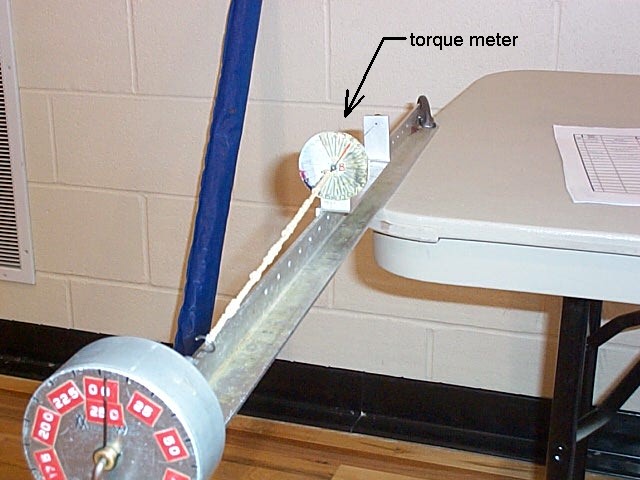
is a torque meter. A torque meter measures the twisting force of the motor
as it is being wound. The torque can be an indicator of how high a model
climbs, how it acts right after launch, as well as give you and indication
if the motor is going to break during winding. Here is a photo of my torque
meter and winding stand. This equipment allows me to wind a motor and transfer
it to my model by myself without the assistance of others. You
can build a simple winding stooge to hold our wound rubber motor.
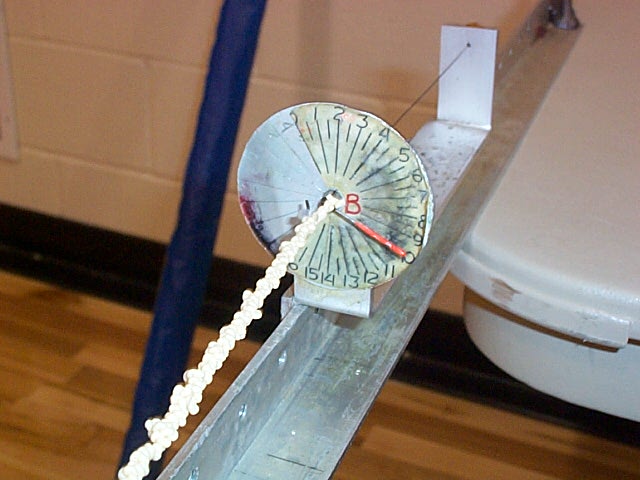
Torque meters can be made or bought from indoor suppliers. All a torque meter is made from is a piece of thin music wire, about .020" diameter and 5" long, which has one end fixed and the other end hooks onto the rubber motor. As the motor gets wound, the twisting force increases, and the torque meter wire starts to twist as well. How it twists is an indication of how much torque the motor is producing. The higher the torque, generally, the higher or longer the model will climb. At this point it is highly recommended that you start to record your model flying sessions in a notebook or similar type of log. What you want to record is data such as turns, rubber size, rubber length, torque, flight time, turns left in rubber after the model lands, how high it climbed, and any other comments about the flight which may be useful too you in the future. This may seem like a lot to keep track of, but believe me when you have not flown your model in a few weeks, you will be surprised at how much you forget.
A typical flight record could
be like the following:
Rubber length: 14.0"
Rubber width: .105"
Rubber weight: 1.98gr
Turns: 1600
Back off turns: 40
Torque: 15.6
Flight time: 4:14
Turns left: 290
Comments: Climbed
to roof, hit the ceiling two times, then peaked out just beneath the lights.
Trim was fine, stalled slightly when coming down, may have hit some bumpy
air.
One of
the terms you may not understand is back off turns. This refers to turns
which you unwind before hooking the motor on the airplane. In the example
above, 1600 turns were put into the motor, then 40 turns were unwound,
and the measured torque was 15.6. The reason you back turns off is because
the torque levels may be too high for the model, either structurally, or
simply because the ceiling is too low. In this example, the torque may
have been 19.0 after the 1600 turns were put in, but after unwinding 40
turns the torque lowered down to 15.6. The lower torque level means that
the model will not climb so fast after launch. If you are flying in a higher
ceiling, then you may not want to back off any turns at all, and use the
extra torque to gain more altitude.
Please
note that some models may act strange under very high torque levels. Some
will fly straight, dive, or other things under these high torque conditions.
If you run into this, then note what torque level your model does not like,
and then back turns off of the motor to lower the torque level. Your model
may not have any problems with very high torques, in fact it may climb
very fast under these conditions. I have hit the ceiling in our 26ft gym
in about 10 seconds with such high torques. Unless you have a higher ceiling,
I would suggest backing off a few turns if this is your situation. When
your model climbs and flies that fast under the high torques, it hits the
ceiling or rafter that much harder and can damage the model. So in general,
I would back off a few turns to take the extreme torque out of the model
when you are winding close to max rubber turns.
The other
item to consider during test flying is how many turns to put into the motor.
The motor has a finite number of turns it will take before it breaks. The
turns chart is a good starting point for figuring this out. The only real
method is to make a few identical motors, and then wind them until they
break. Each motor should be 'broken in' before flying it on the model.
Breaking in a motor is a process of prewinding the motor to allow the rubber
to take an initial stretch from the stress of a first wind. A 14" long
motor that has never been wound before will be a little short of 15" long
after it has been broken in. To break in the motor, look at the max turns
chart and then wind to 90% of that value. So if a motor would take 2000
turns, then do a prewind to 1800 turns and then let the motor unwind. After
it unwinds, check the length of the motor and verify that it has stretched
out.
For test
flying the model right out of the box, I would try about 50% of max turns
just to verify the model trim settings. For flights after that I would
go to 80%, 90%, then 95% of maximum turns. If you wind the motor multiple
times at 95% of maximum turns then the motor can become 'tired'. What this
means is that the rubber looses some of its stored energy potential, and
the model performance will start to suffer. If this happens then fly on
a new motor and let the tired motor recover for a little while.
FLYING:
The last
topic is flying technique. When you are flying you should take note of
how many turns are left when the flight is over. If you have too many turns
left, then your motor is not powerful enough and is too small in width
and or too long. If your model runs out of turns before it lands then your
motor is too short and or too wide. Ideally you should land with
only a few turns left in the motor. I would say if you land with 100 turns
or less then the motor is just about right. Any more than that and I would
adjust your motor size and length. Because the rules limit us to a maximum
of 2 grams of rubber, changing the width of the motor automatically changes
the length of the motor.
As you
fly in different height buildings you may find that different motors seem
to fit your model best. In general, the lower the ceiling, the shorter
and wider the motor will end up being. In higher ceilings, a longer thinner
motor with more turns and maximum torque (very little back) will work better.
Depending
on your flying site you may or may not have a smooth ceiling. Most gyms
have girders or lights hanging down in them so it is inevitable that your
model will hit something. Do not be overly concerned about your model colliding
with obstructions. It is part of the model flying and actually can actually
assist your model. For example, our gym has a divider going down the middle
of it that hangs down about 2 feet below the girder. If my model is climbing
too fast and it hits the divider, then it will drop down below the divider
and start climbing again. It will do this repeatedly until it no longer
has the power to climb up again. The benefit is that it prevents my model
from flying into and above the girders which will undoubtedly catch and
snag the model and causing the flight to be terminated. So it is possible
to use the building structure and layout for strategic reasons.
Having said that, I am afraid
that this is the end of the CD. I hope that you have learned a lot about
how to build a model as well as how to fly a model. I wish you luck in
your Science Olympiad competition and if you have any questions I can be
found on my indoor mailing list. So remember to keep good flying records
and most of all, enjoy your new model airplane!